A simple picoCTF forensics writeup where Sleuth Kit helped me dig through a disk image without hiding behind Autopsy.
Today, we are doing Sleuthkit Apprentice.
There are two main ways to solve this challenge.
One way is using Autopsy, which gives you a graphical interface to browse the disk image.
The other way is using The Sleuth Kit from the command line.
Since the challenge is literally called Sleuthkit Apprentice, using Autopsy felt like bringing a calculator to a mental math contest.
So for the sake of learning, I used the CLI tools.
Painful? Maybe.
Useful? Definitely.
Extracting the File
The challenge gave us a compressed .gz file.
A .gz file is compressed using gzip, so the first step was to extract it.
The command is:
gunzip disk.flag.img.gz
or:
gzip -d disk.flag.img.gz
After extraction, I got the disk image:
disk.flag.img
Now the actual investigation could begin.
Tiny Sleuth Kit Memory Trick
Before starting, this is the short version I kept in mind:
mmls = show partitions
fsstat = show filesystem info
fls = list files
icat = cat file by inode
istat = inspect inode
ffind = inode to filename
ifind = block to inode
blkls = dump unallocated blocks
mactime = make timeline
The basic holy trinity for this challenge was (or most ctf in general):
mmls → fls → icat
That means:
-
Use
mmlsto find the partitions. -
Use
flsto list files inside a partition. -
Use
icatto read a file by its inode.
If you do not know what a command does, MAN UP.
Basically:
man mmls
/Finding the Partitions with mmls
I started by running:
mmls disk.flag.img
The output was:
DOS Partition Table
Offset Sector: 0
Units are in 512-byte sectors
Slot Start End Length Description
000: Meta 0000000000 0000000000 0000000001 Primary Table (#0)
001: ------- 0000000000 0000002047 0000002048 Unallocated
002: 000:000 0000002048 0000206847 0000204800 Linux (0x83)
003: 000:001 0000206848 0000360447 0000153600 Linux Swap / Solaris x86 (0x82)
004: 000:002 0000360448 0000614399 0000253952 Linux (0x83)
mmls shows the partition layout of the disk image.
The important part here is the Start column.
The disk image had two Linux file system partitions:
2048
360448
There was also a Linux swap partition starting at:
206848
I ignored the swap partition because swap is used for temporary memory storage, not normal user files.
So the two useful offsets were:
2048
360448
These offsets matter because Sleuth Kit tools need to know where the file system starts inside the full disk image.
Without the correct offset, the tool is basically looking at the wrong part of the disk and getting confused on purpose.
Searching for Flag Files with fls
CTF challenges often place the flag inside a file with flag in the name.
Not always.
But often enough that it is worth checking first.
So instead of manually browsing every folder like a lost tourist, I used fls with grep.
The command format was:
fls -o <starting-sector> -r disk.flag.img | grep flag
Breaking that down:
fls
lists files and directories from a file system.
-o <starting-sector>
tells Sleuth Kit where the partition starts inside the disk image.
-r
recursively lists files inside directories.
| grep flag
filters the output and only shows lines containing the word flag.
So I tested the first Linux partition:
fls -o 2048 -r disk.flag.img | grep flag
That did not return anything useful.
Then I tested the second Linux partition:
fls -o 360448 -r disk.flag.img | grep flag
This time, I got something interesting:
++ r/r * 2082(realloc): flag.txt
++ r/r 2371: flag.uni.txt
Now we had two possible files.
The important numbers here are the inode numbers:
2082
2371
An inode is basically a file-system record that stores information about a file, such as where its data lives.
In simple terms:
The filename is the label.
The inode is where the file system actually tracks the file.
Reading Files with icat
To read a file by inode, I used icat.
icat works like cat, but instead of giving it a normal filename, you give it an inode number from a disk image.
The command format is:
icat -o <starting-sector> disk.flag.img <inode>
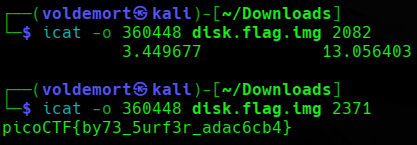
I first tried the inode for flag.txt:
icat -o 360448 disk.flag.img 2082
That did not give the flag.
The * and (realloc) in the fls output suggested that this file entry was deleted or reallocated, so it was not the useful one.
Then I tried the second inode:
icat -o 360448 disk.flag.img 2371
This time, it worked.
Inside flag.uni.txt, I found the flag.
Flag
picoCTF{by73_5urf3r_adac6cb4}
Final Command Flow
The whole solve came down to this:
gunzip disk.flag.img.gz
mmls disk.flag.img
fls -o 360448 -r disk.flag.img | grep flag
icat -o 360448 disk.flag.img 2371
Short.
Clean.
Suspiciously simple after you understand the tools.
Closing Thoughts
This was a good beginner Sleuth Kit challenge.
The main lesson was learning how to move through a disk image from the command line.
First, mmls showed the partitions.
Then, fls helped search through the file system.
Finally, icat read the file using its inode.
I could have used Autopsy and clicked through everything, but using the CLI made the process clearer.
It also made me feel slightly more like a forensic investigator and slightly less like someone randomly poking a disk image with a stick.
Progress.
Tiny progress, but still progress.